
Settings |
PDFs:
There is an important distinction between selecting all pdfs, and selecting none. Let's say the assessor has 20 pdfs, and you click "Select PDF" and select ALL, the range will display as 1-20. That will export all 20 pdfs, no problem. But at some point the assessor adds a new pdf, so now they have 21. When you start the program you will have 1-20 selected. This may be what you want, or may not. If you click the "Select PDF" button and select none, the range will display [Any]. This means always take all pdfs, regardless if the assessor adds new ones or not.
Photos:
Photos are stored in the database as either .tif or .jpg. You can read them right out of the database, or, if you prefer to dump them all to files, you can check the "Export to files" option. You must specify what folder they will be dumped to. The filename of the photo will be in the format: pin,pdf,index.jpg. The pdf and the index are three digit's with leading zeros.
For example, if we had pin 321-322-300, in pdf 7, and there were two photos (one jpeg and one tiff) on that parcel. you'd get two files:
321322300007001.jpg
321322300007002.tif
Sketches:
Sketches are always converted to jpeg. There are two columns in the database, vectordata and imagedata. The jpeg is saved in imagedata and you can pull the picture out of there. If you like, GISWeb can also save the sketch out to a file. It works just like (and uses the same naming convention) as photos.
Parcels:
The LastTransfer date (or, the last time you ran GISWeb) is saved in the giswebx.ini file. You have the option of only transferring those parcels that have changed since the last time you ran the GISWeb. When you enable the "Only Export Edited Parcels Since Last Transfer" option, the "Empty Database First" option will be enabled and you can select it, if you would like. If it is selected, then all the tables will be emptied before the edited parcels are copied (For example: If only 10 parcels had been edited from the last time you ran, your database would only contain 10 parcels after running the GISWeb). If this option is not selected, only the parcels you are going to copy will be deleted and re-copied, thus leaving you with a database containing all the parcels. This process will work for new parcels as well, however there is no way to find deleted parcels. If a parcel is removed on the main database, it will NOT be removed on the gisweb database.
Config File:
You can specify the name of the file for the GISWeb logs. If you want to keep a running log check the option "Append To Log". If you want to clear the log at the very beginning, don't check it. If the editbox is left empty, it will default to your windows temp folder, using the name giswebx.log
Settings screen, Tab Two:
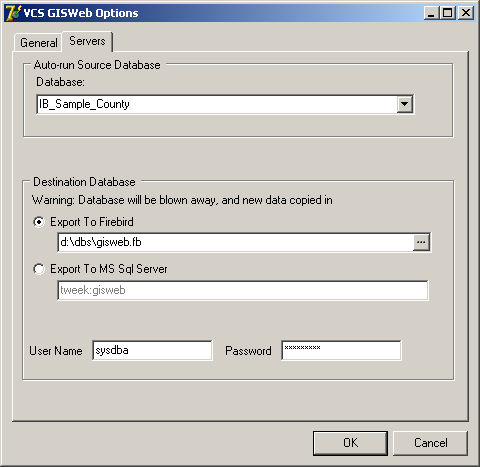
AutoRun Source Database:
On this page you can set the default databases to connect to. When using autorun mode, the program won't prompt you for a database so you must specify it in the "Auto-run Source database". This section is only used when you run in AutoRun mode.
Destination Database:
This let's you choose where to write the data to and which type of server (Firebird or MS SQL Server). It is very important to note: All tables will be deleted from the destination database first, and then recreated, before data is copied in.
The screen above has the warning "Database will be blown away". This is true for the Firebird database, because its easy to delete and recreate it (and faster than dropping all the tables individually ). However, for MS SQL Server, it's not as easy to drop and create a database, so the database is not dropped. All the tables, views, and stored procedures are dropped and recreated.
For Firebird, the edit box needs to be a local filename, for example: c:\dbs\GISWeb.ib
For MS SQL, the edit box needs to be a connect string having the server name, a colon, then the database name. For example: bigserver:gisweb
Note: MS SQL may also have an instance name, if there is one, include it behind the server name preceding it with a forward slash. For example: bigserver\sqlexpress:gisweb
For either servers, if you need a username/password to login, put those in the provided boxes.